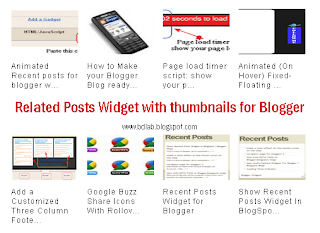
One of the best way to increase page views and readership is using a related posts plugin. After the huge success of thumbnail realated posts widget by linkwithin, Aneesh developed the same widget using custom code which was indeed more reliable and totally customizable.
Now Like wise Wordpress Blogger Users can also have Related Posts with Thumbnails in Blogspot Blogs.To increase page views per user this widget can be very helpful, you can easily display the Related Posts with thumbnails below every post or below the post area with very ease.
Related Posts Widget with Thumbnails for Blogger
Here are the detailed steps to install the related posts widget for blogger with thumbnails
STEP #1
Log in to Blogger -> Layout -> Edit HTML and select the tick-boxExpand Widget Templates
Then, find (CTRL+F) this code in the template:
</head>
And immediately before it, paste this code:
<!--Related Posts with thumbnails Scripts bdlab.blogspot.com-->
<!-- remove --><b:if cond='data:blog.pageType == "item"'>
<style type="text/css">
#related-posts {
float:center;
text-transform:none;
height:100%;
min-height:100%;
padding-top:5px;
padding-left:5px;
}
#related-posts h2{
font-size: 1.6em;
font-weight: bold;
color: black;
font-family: Georgia, “Times New Roman”, Times, serif;
margin-bottom: 0.75em;
margin-top: 0em;
padding-top: 0em;
}
#related-posts a{
color:black;
}
#related-posts a:hover{
color:black;
}
#related-posts a:hover {
background-color:#d4eaf2;
}
</style>
<script type='text/javascript'>
var defaultnoimage="https://blogger.googleusercontent.com/img/b/R29vZ2xl/AVvXsEhz43TrD3_ktLwKbUHcnswrxlmDI4DI1BT6mRAWWxtG5v5XvPs13uPq5UIab3YoF0_2kanDIBMp9fo0CCUHQera2gHU2XTGyHmUdMujX24GXCS1ejeU0pzX0GTauN1bMqZM3tVrwY_KTQGc/s1600/no+Image+1.png";
var maxresults=5;
var splittercolor="#d4eaf2";
var relatedpoststitle="Related Posts";
</script>
<script src='https://sites.google.com/site/bdlab12/javascript123/bdlab-related-posts-with-thumbnails-for-blogger-pro.txt' type='text/javascript'/>
<!-- remove --></b:if>
<!--Related Posts with thumbnails Scripts bdlab.blogspot.com-->
STEP #2:
Now find this code in the template:
<div class='post-footer-line post-footer-line-1'/>
If you cant find it then try finding this one
<p class='post-footer-line post-footer-line-1'/>
Now immediately after any of these lines(whichever you could find) place this code snippet
<!-- Related Posts with Thumbnails Code Start bdlab.blogspot.com-->
<!-- remove --><b:if cond='data:blog.pageType == "item"'>
<div id='related-posts'>
<b:loop values='data:post.labels' var='label'>
<b:if cond='data:label.isLast != "true"'>
</b:if>
<script expr:src='"/feeds/posts/default/-/" + data:label.name + "?alt=json-in-script&callback=related_results_labels_thumbs&max-results=5"' type='text/javascript'/></b:loop>
<script type='text/javascript'>
removeRelatedDuplicates_thumbs();
printRelatedLabels_thumbs("<data:post.url/>");
</script>
</div><div style='clear:both'/>
<!-- remove --></b:if>
<b:if cond='data:blog.url == data:blog.homepageUrl'><b:if cond='data:post.isFirstPost'>
<a href='http://bdlab.blogspot.com'><img style="border: 0" alt="Related Posts Widget For Blogger with Thumbnails" src="https://blogger.googleusercontent.com/img/b/R29vZ2xl/AVvXsEiIRCcQOMLv0OsMEO7hnKyclCyrBscp9WrnwKVxbwBONgJsdwyT3Sk8LbgYassw2HPfDC3p73He0VZ27Y0zDEqdYJKJ9d9HRxH8AvhlAZmoSqdG26KJQ9m0Eh6UErFhC93Ar9IdwGvBkUqU/s1600/blogger-widgets.png" /></a><a href='http://bdlab.blogspot.com' ><img style="border: 0" alt="Blogger Templates" src="https://blogger.googleusercontent.com/img/b/R29vZ2xl/AVvXsEiuKVVUFAS5YFvIzF2XjC_3vFTHVs0vX2Eqx0iv-ZPLxLiPuIKMqf9yvvXysjQOFM7dmyj-RUsCWNX5aHpsNnz4f4RYrzxNBQDp3Wn3beJxnlUD1dV6ARmNvuZlMAq7oPz4G1OB-UlGWQIX/s1600/blogger-templates.png" /></a>
</b:if></b:if>
<!-- Related Posts with Thumbnails Code End bdlab.blogspot.com-->
Now Click "Save Template"
You can adjust the maximum number of related posts being displayed by editing this line in the code.
var maxresults=5;
To edit the title of the widget you can change this line of code
var relatedpoststitle="Related Posts";
To change the default thumbnail, you can edit this line of code
var defaultnoimage="https://blogger.googleusercontent.com/img/b/R29vZ2xl/AVvXsEhz43TrD3_ktLwKbUHcnswrxlmDI4DI1BT6mRAWWxtG5v5XvPs13uPq5UIab3YoF0_2kanDIBMp9fo0CCUHQera2gHU2XTGyHmUdMujX24GXCS1ejeU0pzX0GTauN1bMqZM3tVrwY_KTQGc/s1600/no+Image+1.png";
To Change the Colour of the Splitter Line , edit
var splittercolor="#d4eaf2";
Finish

No comments:
Post a Comment